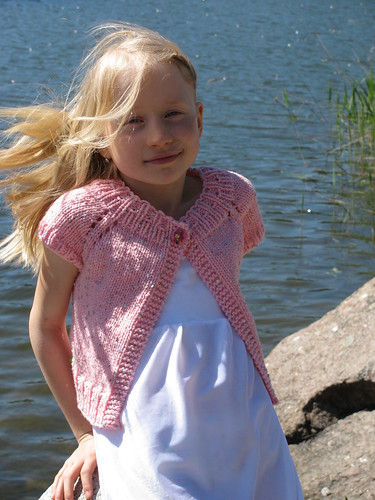
Keiju (finnish word for fairy) is top-down knit bolero with raglan sleeves and one button fastening.

Size: to fit about 120-130 cm tall child.
Finished measurements: length - about 33 cm (13 inches), bust - about 64 cm (25 inches), sleeve measured from the neckline - about 16 cm (6 1/4 inches).
Yarn: Novita Kide in pink (513), 2 balls = 200 gramms.
1 button, about 2,5 cm (1 inch) in diameter.
Needles: 6.0 mm (US10) circular needle, DPNs of the same size for knitting the sleeves, if prefered.
Gauge: 15 sts and 21 rows in 10 cm (4 inches).
Note! If you'd like to learn Estonian cast on, check out my video on flickr (short version) or YouTube (longer version). Don't mind the fact, that I am speaking Finnish, just follow the moves :D
Yoke
Cast on 72 sts using Estonian cast on or long tail cast on. Purl one row (WS).
Row 1: k4, *k1, p2*, repeat *-* untill 5 sts left, k5.
Row 2: k4, *p1, k4*, repeat *-* untill 5 sts left, p1, k4.
Rows 3-4: knit as rows 1-2.
Inc row: k4, *k1, p1, m1 by picking up the yarn between two sts of the previous row and purling (NB! do not purl tbl), p1*, repeat *-* untill 5 sts left, then make a buttonhole: k2, yo, ssk, k1. 93 sts in total.
Next row (WS): k4, *k1, p1*, repeat *-*, p1, k4 in the end of the row.
Knit in established pattern - 4 sts of garter sts on both edges and k1, p1 ribbing between them - for 4 more rows. When knitting the last row, place stitch markers as follows: 18 sts (right front), sm, 14 sts (right sleeve), sm, 29 sts (back), sm, 14 sts (left sleeve), sm, 18 sts (left front).
After that start raglan increases. Continue knitting in st st, except for 4 sts edges in garter st.
Work increases by knitting to one sts before sm, yo, k1, slip sm, k1, yo, knit to one st before next sm, yo, k1, slip sm, k1, yo etc. Make increases in every third row total of 6 times. Work 5 rows even in established pattern. 141 sts total.
Body
In the next row divide for body and sleeves as follows: knit to the first sm, slip 28 sts to stitch holder or waste yarn to wait, cast on 8 sts, knit sts of the back, slip 28 sts of the other sleeve to holder or piece of yarn, cast on 8 sts, knit to the end. Place sm under the sleeve to indicate right and left side "seam".
Work even for about 4 cm.
Inc row: knit to 1 st before sm, yo, k1, slip sm, k1, yo, knit to 1 st before next sm, yo, k1, slip sm, k1, yo, knit to end of row.
Work even for about 5 cm (2 inches).
When work measures about 9 cm (3½ inches) from armhole, work one more increase row in the same manner as the first one. 109 sts in total.
Continue working even.
When piece measures about 15 cm (6 inches) fron armhole, start working in ribbed patter as follows: k4, *k1, p3*, repeat *-* untill 5 sts left, k5. Work in established pattern 3 more rows.
After that work 6 rows of k1, p1 ribbing with 4 sts of garter st on both edges.
Bind off all sts.
Sleeves
Slip 28 sts from holder/waste yarn back to the circular needle or DPNs if prefered. Pick up 10 sts over the gap under the sleeve. Knit one row. Work 4 rows in k1, p1 ribbing. Bind off all sts. Work second sleeve in the same manner.
Weave in loose ends, sew on a button.